Tuesday, April 17, 2012

I GOT WORMS!

"I got worms."

"I beg your pardon?"

"That's what we're gonna call it: I
          Got Worms. We're gonna specialize in
          selling worm farms you know, like
          ant farms. A lot of people don't
          realize that worms make much better
          pets than ants. They're quiet,
          affectionate, they don't bite, and
          they're super with the kids."


This post is going to be all about THE worms, so if you are uninterested there will be more to read just another time....For now it is all about my garbage eating pets. That was also a quote from Dumb and Dumber if you cannot remember what movie that ridiculousness was in.

The time has come and I got the worms to put in my compost (finally) that I got for christmas! I am not going to lie, I am a little nervous to start these critters in their new amazing life because if you do something wrong, you will definitely know about it. Not enough food, they will get angry.  Too much food and it will get smelly, not enough leaves or dirt they are just going to go find somewhere else to live. So.....I am going to try my darnedest to keep it going perfectly.

Answers to common questions I have gotten so far: No I did not name them, there are just a few too many to get them all straight. What I do know so far is that they are quiet, and pretty affectionate. At least to the food that is being put in there.  Yes, they are specific worms, and not just any ole worm you dig up from the yard.  The breed is red wigglers and they are perfect for eating your food and turning it into the good stuff to later plant with.  They really like avocados, and not so hot on tomatoes, BUT there is still a lot more experimenting to come regarding their favorites.  This week to be added are egg shells, garlic shavings, and rice.  I know what you are thinking? Who is this nut bag that is talking about worms that eat garbage as if they are real people or maybe something resembling a dog? Well, it is me....unfortunately.  When I tell people that I have started this composting thing-a-ma-jig the response either goes one way or the other. No in between, but rather "Gross! You keep them in the house?"  OR  "That is pretty cool, you keep them in the house?"  Yes I do, currently that are in a very sealed composting bin in the kitchen just hanging out waiting for me to add in the the garlic scraps from the garlic shrimp linguini I made earlier this week. Picture of bin is just below, keep scrolling!

The set up was very simple.  With the compost bin came some dirt that you soaked in water, mixed with shredded newspaper and voila! The home for the worms are ready.  You just had to add some food that I had been saving, add some more newspaper on top of that and they should be happy as a clam.  For the amount of worms I have now, I need to add a 1/2 lb of food a week.  I think I am going to save much more then allowed since I going a little crazy with saving EVERYTHING because it is new and exciting and I am a 6 year old like that. Currently I have a couple piles that just keep growing and growing like an magic expanding dinosaur sponge when you add it to magic water.

You made it to the picture of the bin. Nice color green, right?  The bin in this picture is broken up into three sections. The bottom section is the stand it is on.  The second section has a spigot to extract any excess moisture, and this is full of nutrients to add to the house hold plants. Pretty pumped about that. The top layer has the worms and food and dirt and all of its glory. 

This is the picture of the worms in the dirt with newspaper. If you look closely you can see the little red wigglers hanging out. I was thinking about taking a video but thought that might really freak people out and they would never read this again. 

Last but not least, since we are on the subject of recycling and basically saving the planet like Clark Kent, I mean Superman, my sister is doing a project on environmental literacy. It's pretty neat, so here is a shout out to my sister's website, CHECK IT OUT! I should also mention she is in her last year of becoming a teacher at Michigan State, so this is one of her last projects as an undergraduate.

Flanagan out. 

**If for some reason you would like more info on all the worm stuff, I have great book full of info which helped me get going, the dealer (yes dealer) I got the worms from, and the company that makes the bin with start up kit. Just drop a line, I would be more then happy to lend my help. Or if you just have crazy questions because this whole thing is bonkers, drop many lines!

Now Flanagan out. 

Wednesday, March 28, 2012

What Gets Me Going

Hey All, What do you call an alligator that wears a vest?   An INVESTIGATOR! 

Onto real world blogging......

A lovely MAN left a MAN grate for the grill out on the concrete for a couple days, and of course it rained and left a nice rust stain on the concrete. A co-worker gave me a book called Talking Dirty with the Queen of Clean, so I looked that bad boy up in there to see how to remove that stain.

How could you not listen to this hottie?
She suggested to lightly sprinkle the area with water and put a package of KOOLAID LEMONADE on top of the sprinkled water. Then cover with plastic wrap, and let sit for about 15 minutes.  When you do this you literally will start hearing the acid bubbling on the cement. It's kinda neat. Isn't it great that this is something that also goes into our bodies?  This also reminds me, put on a pair of gloves if you have them lying around the house.  I checked the progress after 15 minutes, because it was a pretty good stain, and left it for another 15 minutes. After that time has set, pour more water on top of the stain and scrub with a brush.  Make sure to remove any excess KOOLAID by rinsing really well. 

Here is the before picture:
And here is the after picture:

It did work pretty well, obviously an improvement.  This picture doesn't really show it, but there are still some little stains but it took out a good chunk of them.  For this particular stain I probably would have used two packets of KOOLAID, and now that area of the concrete is impeccably clean, and the rest of the patio looks pretty discusting. That clean queen really knew how to talk dirty to me.  This is not the only thing that I have looked up in that book for, it really is amazing! For Real. Here is the link on Amazon.

There is also ANOTHER book that was always around when I was growing up that my mom loved.  It is the same idea as Talking Dirty, but it is called Haley's Cleaning Hints (on amazon HERE) and looks like this:

He is also incredibly hot, so it is really quite a hard decision as to which hottie to take cleaning advice from.  Good luck! Hope you enjoyed, and as always thanks for hanging out.

Wednesday, March 21, 2012

The Reader's Digest Lesson on Life

I was also given a Rider's Digest for blog material, also thank you, and this one is about simple ways to easily tackle those big or small life decisions.

#1. How to say "No!"
It is hard to tell someone no and much easier to agree to help out, but sometimes that isn't always what you really wanted to do.  Here are some ways that are short and sweet to tell them no thanks.
     > "No, but thank you for asking."  This is a great one because you thank the person for thinking of you, but you just can't do it right now. 
     > "I'd love to, but I simply can't make that big of a commitment. Is there some other way I could help out?"  This one is saying that you aren't available for the task being asked of you, but you are not completely blowing them off.  I thought this one could be tricky because what if they ask something else of you and you can't do that either.  Tread lightly..... 
     > "I'm not able to take that on right now."
     > "No, but I bet so-and-so can help you with that."  This one is just basically saying no and then adding a generous side of helpfulness.  Hopefully the other person would love too, and you are not just trying to get back at them. HA
     > "I'm really not okay with that."  This one is if you are really trying to set the record straight and be froward. It is probably used more for reasoning in not supporting organizations or candidates. 

#2. How to Write a Thank You Note
The thank you note is always a great way to show someone that you are thinking of them, and how appreciative you are for their gift, no matter how large or small it is.  The note doesn't have to be long, three sentences is plenty but mention the gift, how much you enjoy it, and your appreciativeness for the sender's thoughtfulness.  I always like to add something a little personal intertwined into it so that it isn't some generic thank you note that anybody could write, but it came from the heart.  For me personally, I add an inside joke if applicable, it's fun and astute.  

Write the note as soon as you get the present, this way they know that you got the gift and are enjoying it.  Now you know my secrets.....

#3.  How to Avoid Jet Lag....a more natural way to go
A. Eat- starches like pasta and rice (carbs) to help your body adjust more quickly to sudden jolts to circadian rhythms.
B. Drink- the air in the cabin tends to be bone dry which then causes dehydration. This is actually a really big contributor to jet lag. Pass up the caffeine and alcohol, and drink lots of water before, during, and after your flight. 
C. Sleep- If you're flying at night, use earplugs and an eye mask, turn down the lights, cover up, and adjust the your air conditioning valve to cool setting. This tells your body that it is time to go to bed. 
D. Switch your watch to local time before getting off the plane.
E. Resist the urge to nap- when you get to your location try to stay awake with every ounce of you.  If you land in the morning, take a shower, eat some eggs, and head on your vacation way. It says to try to jog or swim later in the day which will help you fall asleep naturally, but probably in most circumstances this would be hard to do. 
F. Stay up as late as you can. It would be great to try to stay up until the time you normally go to bed, or very close to it. Then sleep in as late as you can the next morning. By that night you should have been able to adjust and used to the new time zone. 

Here are two links that are useful for children adjusting to jet lag:

>>Just the other day I was looking for a recipe in my Vegetarian Times and I saw a natural RX for jet lag. It is called Melatonin. A dose of this slumber-inducing hormone can help ward off the sleep disruption and fatigue caused by jet lag. Each night, melatonin is released by the brain's pineal gland and this chemical monitors the body's internal clock which can get all kinds of messed up when traveling across multiple time zones. It is suggested taking up to 1 milligram of melatonin before going to bed about two days before your flight, once you reach your destination, and also continue three days after you reach your destination. This is just a more natural drug that won't leave you feeling drowsy and crabby if that is what you are going for and if you think the above suggestions are probably BS.  I have not tried this myself but I figured I would throw it out there in case anyone is curious, like Benjamin Button.

Flanagan out. 


Thursday, March 8, 2012

The Body Explained...

I read an article in Parade that was titled, Your Body Explained then asked to take it to write about, thank you, and so here I am with some quirky little facts.
1. Why do I wake up in the morning with gunk in my eyes? 
That crusty stuff is actually dried tears because your tear glands are constantly watering your eyes to flush them out of irritants. While you are awake the act of blinking naturally flushing them out, but while you are sleeping it is a completely different story, which causes the goobers to cluster up while sleeping.

2. Why does it seem as if mosquitos find me more delectable then other people?
This isn't something that you are projecting, it can be actually true. Those nasty blood suckers are drawn to a variety of signals such as heat, carbon dioxide, movement, and the smell of skin secretions like lactic acids. No one really knows what perfect combination of these aspects attracts them more then not. One study even found that mosquitos prefer people who recently downed a beer. So that is my problem!

If you do happen to be the meal of choice, wear repellent and pass on the brew. If you hate that nasty bug smell, try rubbing dryer sheets all over you. They have been shown to work okay, but it's not as good as those deet ridden repellents.

3. Why do men get more hair in some places and less in others, especially when they get older?
The "George Costanza" effect tends to be a common sign of aging, and it is caused by dihydrotesterone, known to us common folks as a sex hormone to which some men are genetically predisposed to become more sensitive too (according to Spencer Kobren, founder of the American Hair Loss Association). When that sensitivity occurs the hair follicles on the head shrink and follicles elsewhere like on the back or nose or ears become stimulated and just start growing that hair.  I thought this was fascinating! Who knew?

4. Why do I huff and puff climbing stairs when I can easily run a mile outside or on a treadmill?
It is a lot easier to pull a heavy object along a flat surface then it is to pick it up, right? When you are running you are barely lifting your own body weight, but when walking up a typical staircase at a 45 degree angle you are required to move 70% of your body weight against gravity. Unless you are running up stairs, then you are basically doing both and getting a great workout. It makes total sense, and also makes me feel better when I get winded walking up stairs.

5. Why do I cry when I chop unions?
Tears when chopping unions are caused by the release of a chemical called lacrimator. In latin it literally means 'to cry'. When you slice into an onion, the chemical is expelled into the air and once it reaches your eyes and nose it breaks down into irritating compounds that attack those nerve endings.  Your eyes produce tears to rinse away the toxins. If you want to reduce this effect because it just hurts to cut onions, try pre-chilling the onions in ice water for 30-60 minutes. This slows down the enzymatic reaction that releases the lacrimator, which means fewer molecules in the air so fewer tears. If I was writing a college paper I would site who wrote this science-y stuff, and so his name was Harold McGee author of On Food and Cooking: The Science and Lore of the Kitchen, not Sarah F.

6. What is earwax and why do we produce it?
A normal Q tip. 
Earwax is made up of moisturizing oils, infection fighting enzymes, and dead skin. When you try to remove it and shove a Q tip in there you are actually just packing it down further and further into your ear which hardens and get stuck.  As my grandmother was getting older we all thought she was going deaf because she couldn't hear a word we were saying, but it actually turned out she had been using Q tips for the last 50 years and had shoved ear wax so far down there she couldn't hear anymore. Don't worry, it got removed and she could hear as good as new and yelled at us for always talking to loudly at her.

This man is supposedly also
called Q Tip, just a famous one. 
A helpful tip to avoid deafness is instead of using the tips with a side of Q, clean your ears while showering by gently tugging on the lobes which straightens the ear canal and allows water to wash away excess wax. It's hard to ween off the tips, I have tried and sometimes I just need to hold it in my hand just because, but in the long run it is better for your ears.

Hope you enjoyed this quirky nonsense.

Sunday, March 4, 2012

March Madness Is Upon Us

Happy March, it is almost Spring, AND we had one of the warmest winters that Illinois has recorded.  Here is the Chicago Tribune mini article/video about it.

Been doing some experimenting at the Sarah F's lab and have a few things for you all.  First being the magnetic strip I put up in the bathroom for all my bobby pins and things. This one I was really really excited about it!
I had kinda a hard time finding it because I was going to Home Depot, and Staples trying to find something that was a magnetic strip, not just a metal strip that can have magnets on it. I finally did find something at Hobby Lobby for $6.99 and it it a strip that has adhesive on the back to stick directly on the wall.  I have found with previous experience that the adhesive is not that strong and it usually has to be reinforced with some other type of glue. I used glue dots, and a little bit of hot glue to stick it directly onto the wall.  I was really hoping for something that did magnetize strongly so that I could also stick my tweezers on it, but it is too weak.  This might be the solution for the heavier things if needed.  Still excited for the bobby pins, and for them to be all in one place. WHOA!

A little while back I also bought a magnetic key/mail holder from the Container Store and mounted it right by the door.  This is what it looks like! I suppose this post should have been called, "I'm obsessed with magnetic things."  It really is great because there is a place to put the keys right when you walk in the door, and it is incredibly inexpensive.

Onto non-magnetized things, I have been swimming occasionally and have the problem of getting water in my ear and just wanting to hang out and NOT leave.  Sometimes the hoping on one foot while tilting your head so the water drains out works, but I also found another little trick if that also doesn't work.  Jump on the bed, preferably on the knees, about 3 or 4 times and then fall over to the side of ear where the water is bothering you.  The trick is to literally fall. I was throwing my head into the bed and it wasn't working so hot, but if you just fall, it seemed to come right out.  Don't hurt yourself!

Until next time. Flanagan out.

Saturday, February 4, 2012

A Plethora Of Things


Happy February everyone, filled with no snow and 6 more weeks of winter, supposedly. I have just been collecting a hodgepodge of things for all walks of life, so I hope they can be useful to you. 

Gift Tags --> This was a completely donated idea, and I thank you for it. At the end of the holiday season you always have all your cards that were sent to you, and instead of throwing/recycling them you can make them into gift tags for the following year. Maybe get those scissors that have a funky blade, and cut away the part that is really cute where the back side is of course blank. Punch a hole, run some string through it, and TA DA! you have a sweet new gift tag.

Folding Fitted Sheets --> I just tried this one today, and loved it. Those fitted sheets are always such a pain in the A.


How to Organize the linen closet --> After I folded my fitted sheets, then I grouped together the others and put them in the pillow cases to have them be more organized and space smart in the closet.

This is not a picture of my closet.


Notes on the mirror--> I have been doing this for a while but it didn't really dawn on me until recently that it could be a blog idea. Sometimes I am the phone, or I need to make of list of things and I don't have a pen or paper. For me personally I am always brainstorming in the shower, so I keep some DRY ERASE markers in the drawer in the bathroom and write with them directly on the mirror. Neat! This could also be great with kids, but you do have to watch if they decide to decorate the walls.  It can also easily be removed with windex or vinegar and water. 

Speaker by a simple bowl --> My sister sent me a link to this great idea for taking a bowl and putting your ipod of phone into it to amplify the sound.  It is kid tested, mother approved and does in fact work. It doesn't make it loud enough to hear over an entire room of people, but if you need just a little extra sound it is pretty useful.  Speaker in a bowl!


Keeping that beautiful skin --> I read an article in Allure all about how to make your skin the best that it could possibly be in 2012. It is the year for YOUR skin, how exciting! I found some parts interesting, and thought I might pass them on. 
  1. Moisturize after showering- Warm showers strip your skin of it oils, as does the dry winter air naturally, so lube up right after you get out of the shower. It is recommended that you do so within ten minutes of turning off the water, if you wait any longer your skin starts loosing water vapor, drying it out more. 
  2. Take off your makeup before bed- I always wait until I am too tired and want to give up on it, but what the article said that I particularly liked was when you are home for the night, take it off right away, so when you are too tired, it is already done. I tell you geniuses that write for that Allure magazine. 
  3. Clean up after the gym- This is of course very obvious, but I am guilty of starting to do things around the house or just in general while I am still in my sweaty clothes. The article suggested to switch out of clothes right away and if possible shower as soon as available. Otherwise all those pores get clogged from sweating and your skin will show for it. 
  4. Clean your makeup brushes- Makeup and skin oils build up which creates a breeding ground for bacteria that could cause irritation. Wash your tools monthly with liquid hand soap or baby shampoo and luke warm water, rinse well and squeeze out excess water. I did do this but then I just let the brushes dry however they were laid down. My suggestion is reshape them into how you like them right after washing, it helps a lot. 
  5. Keep your hands from your face- The act of touching your face with your fingers brings pore-clogging oils and dirts to the skin. Recommended is to not touch at all, but if you are like me and cannot resist, it is suggested applying over the counter hydrocortisone cream right away which helps with the inflammation and prevent long lasting marks. 
A joke to leave you with until next time. What do you call it when you mix a cow with a smurf? Blue cheese! The smurfs movie gave me the pleasure of this joke. 

Sunday, January 15, 2012

How To Make A Paper Snowflake

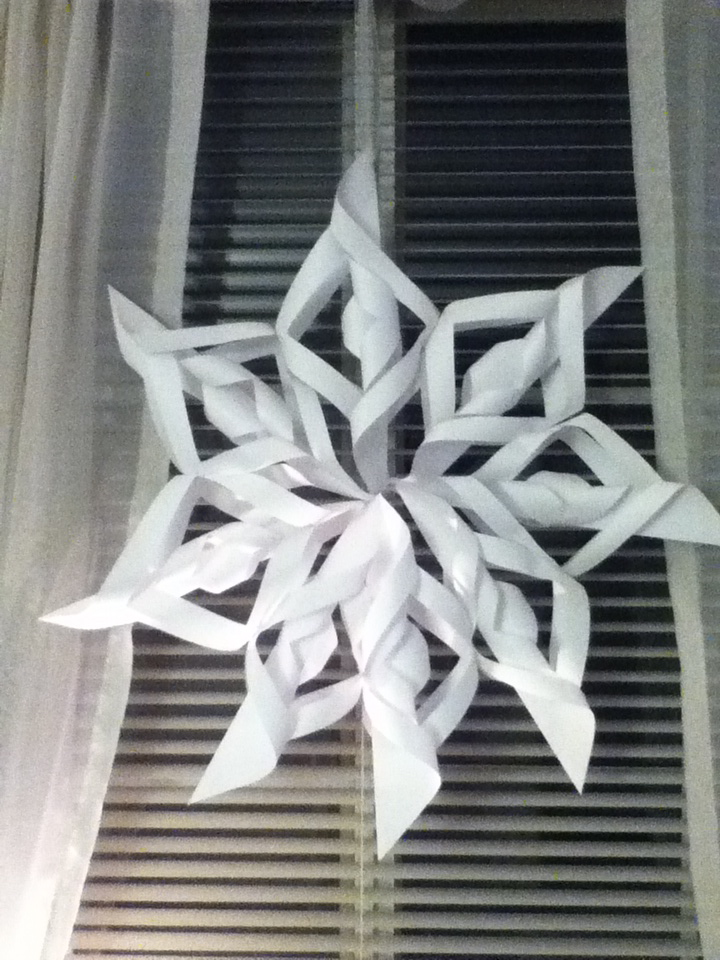
HI! When the winter comes I love making these winter (paper) snowflakes to hang around the house.  They are rather simple to make, and take about 16 minutes (on average) and I wanted to share with you how to create these beauties.  The end result is the picture right below, but I have broken down step by step, with pictures, the construction process of one of these bad boys. 

Supplies you are going to need: 
- 8  pieces of 11x8 1/2 paper (they can be any color, and I find computer paper is the easiest to manipulate)
-A pair of scissors
-Some scotch tape
-And finally, a stapler
1. Fold the paper to make a perfect square. This is done by simply folding over the the corner to the nearest edge. 


2. Cut off the excess strip of paper, after done will form a folded triangle
 3. Fold the paper in half again (this has been done two times now) and you will still have the shape of a triangle, but just a smaller one.  MAKE SURE the folded part is closest to your stomach or for all intent and purposes the bottom.  ALSO, the long triangle side (hypotenuse) should be on the right. This is the key to the whole thing, and I think the hardest part. 
 4.  This part might get a little tricky too, but I have faith. You are then going to cut from the 'bottom' going upwards keeping PARALLEL to the longest (hypotenuse) side of the triangle going RIGHT TO LEFT. You are going to 3 slits about 3/4 the length of the paper.  The very end of each slit should line up evenly. 
 5. After you cut the slits, it should look like this.  If it doesn't, just make sure the fold in on the bottom closest to you, and the longest side is on the right.  

 6. Next, you are going to fold over the 'smallest' slit to meet each other and then tape so if forms a circular shape like pictured above. 
 7. Then turn over the paper and you are going to do the same thing with the next slit, so that the slits that are being taped are making an 'every other' pattern. 
8. This is what it will look like when you alternate each way and tape the slits together. 

 9. For this next one you will obviously need another piece of paper to attach to the other, so please repeat steps 1-8, and come right back here to hang out and continue. 
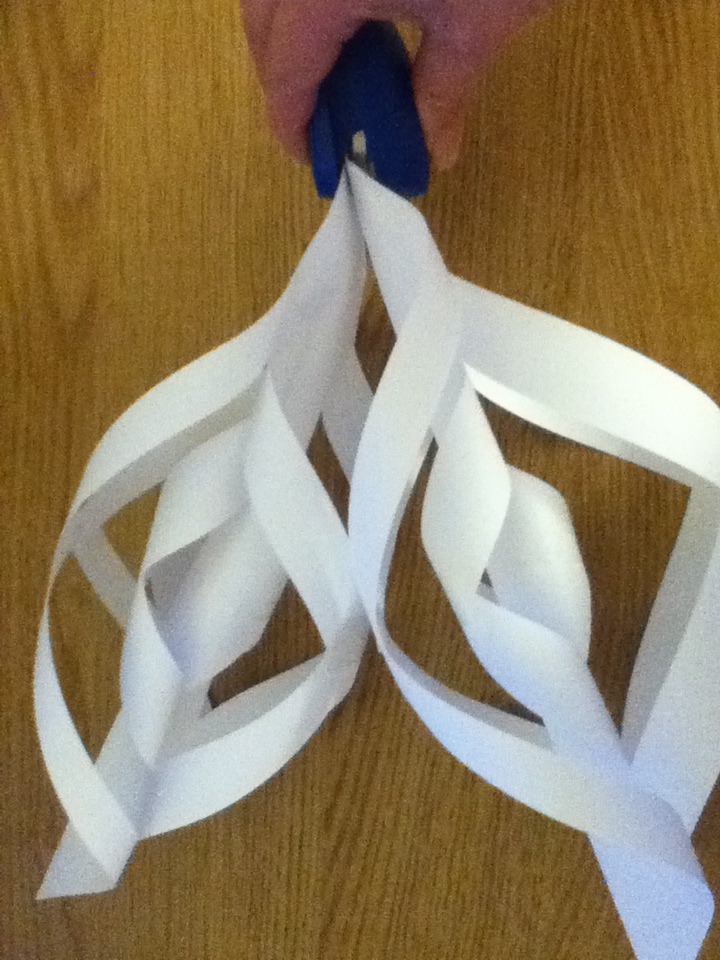
        ***You are then going to take the tip of each 'piece of the snowflake' and STAPLE them together like pictured. 

 10. After the tips are stapled, you are going to STAPLE the edges that meet so when the are all connected, they will stay securely together.  Refer to picture if this is a little confusing. 

11. You are going to continue making serveral of these pieces of the snowflake and then staple them together at the tip, and then where each edge meets. As you add more pieces of paper it gets a little more tricker to staple, so just watch out for your fingers!

This is the finished product! You did it! I punched a hole in the top, added some string and now they are the winter window decor for the windows.  A small side note- they also sell the kits to make these at Paper Source, and you just got the inside information from this nifty blog. Enjoy!